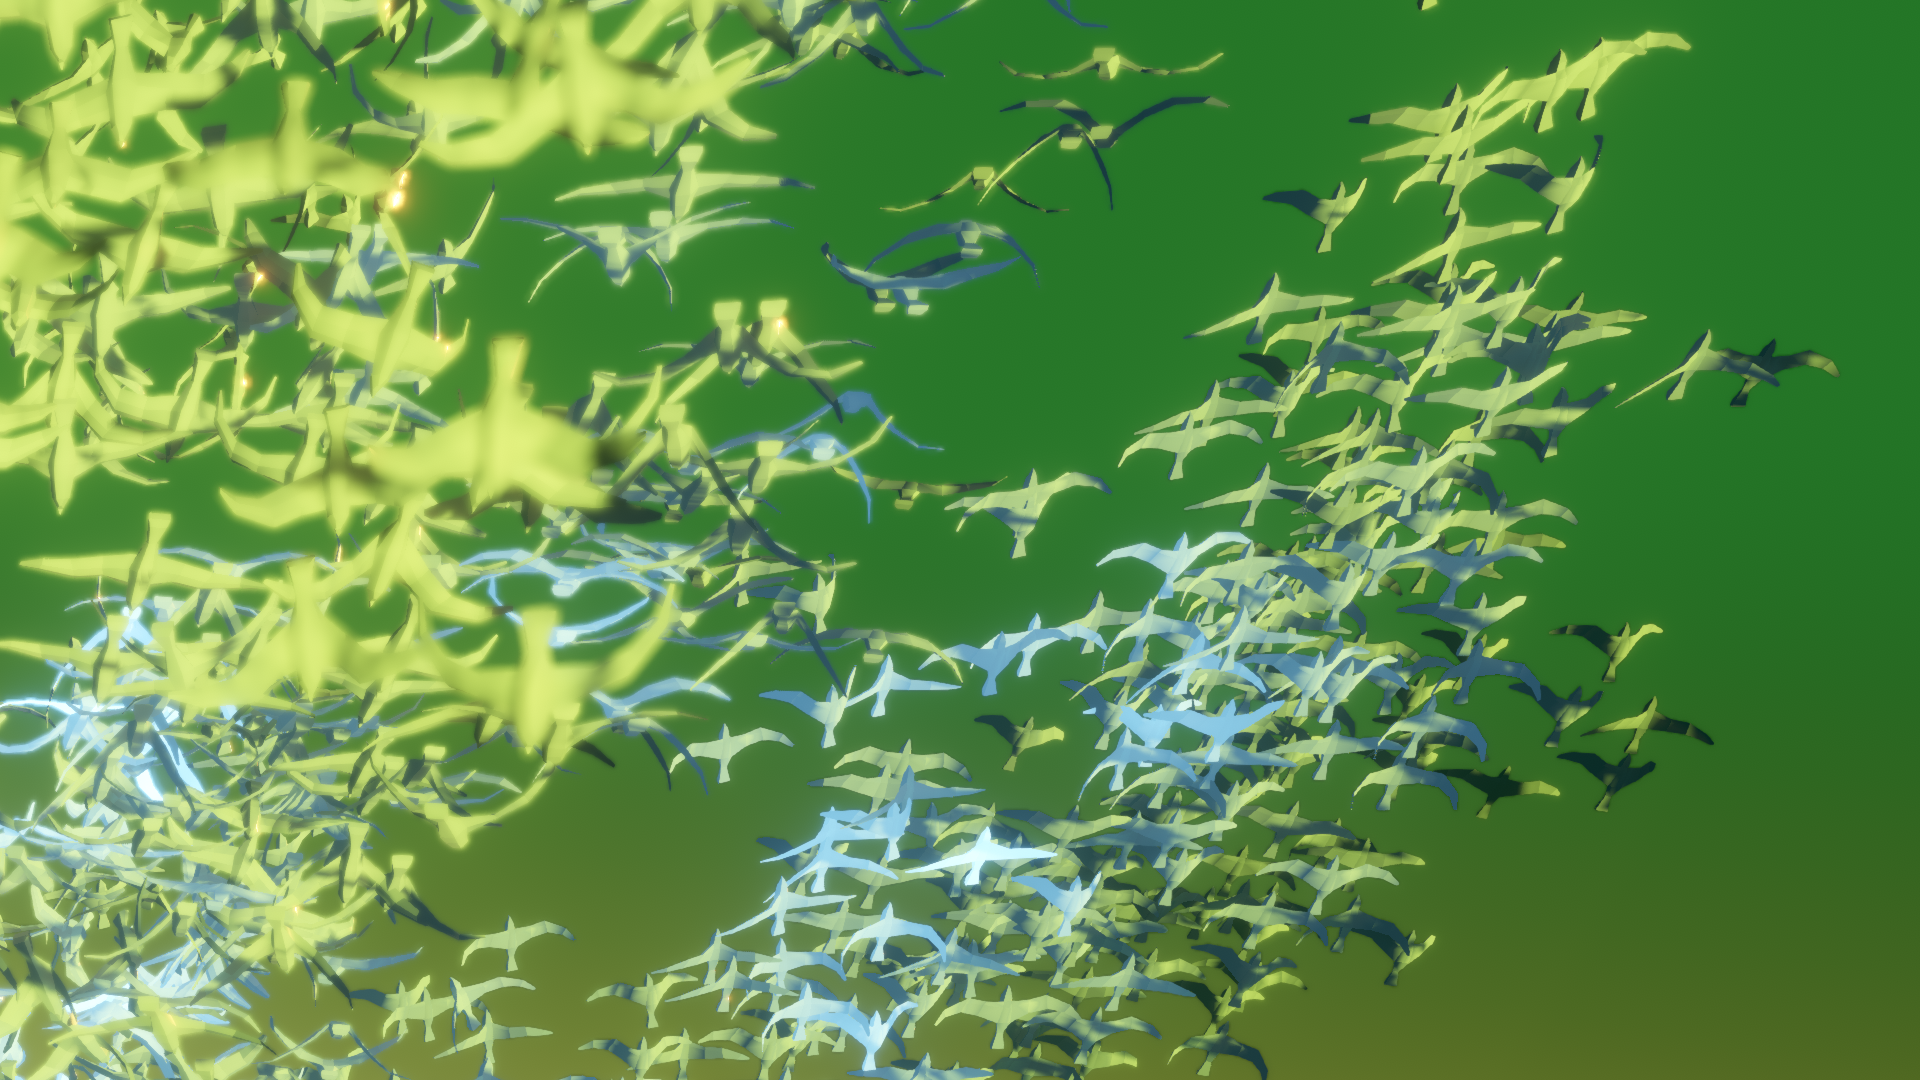
Figure 1.1: A flock of birds flapping their wings
Hello, I'm Sugino! This chapter displays thousands and tens of thousands of skinned animated objects.
Figure 1.1: A flock of birds flapping their wings
In Unity, I think you'll be using the Animator and SkinnedMeshRenderer components to achieve character animation.
For example, what if you want to represent a flock or crowd of birds? Would you like to use Animator and SkinnedMeshRenderer for thousands or tens of thousands of character objects? Generally, when displaying a large number of objects on the screen, GPU instancing is used to render a large number of objects at once. However, SkinnedMeshRenderer does not support instancing, which renders individual objects one by one, which is very heavy.
As a solution to solve this, there is a method to save the animated vertex position information as a texture, but in this chapter we will explain how to actually do it, the way of thinking and application until implementation, and points to be noted. I will.
Please feel free to ask questions on Twitter (to @sugi_cho) as some explanations may be omitted or some parts may be difficult to understand. If there is something wrong, I would appreciate it if you could point it out (._.)
First of all, I would like to see how heavy the processing would be if a large number (5000 objects) of normally animated objects were placed. This time, we have prepared a simple animated horse 3D object with 1890 vertices.
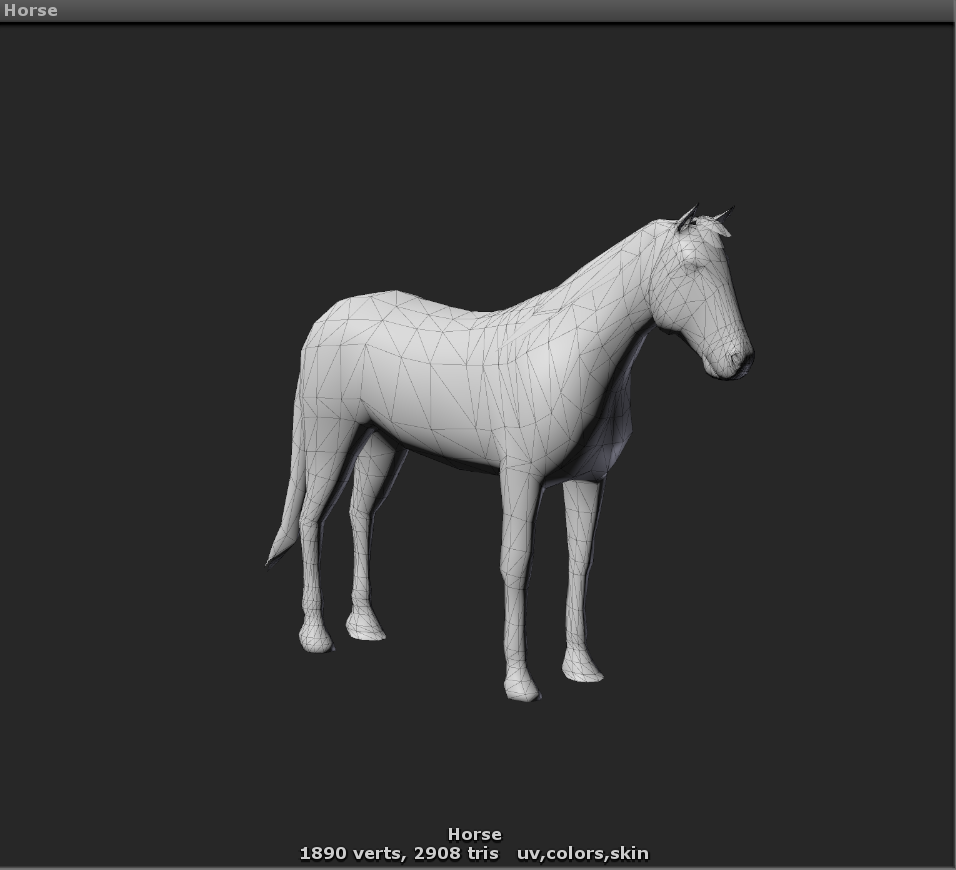
Figure 1.2: Horse model used
When I actually moved it, I can see that the FPS is 8.8, which is considerably heavier. Figure 1.3
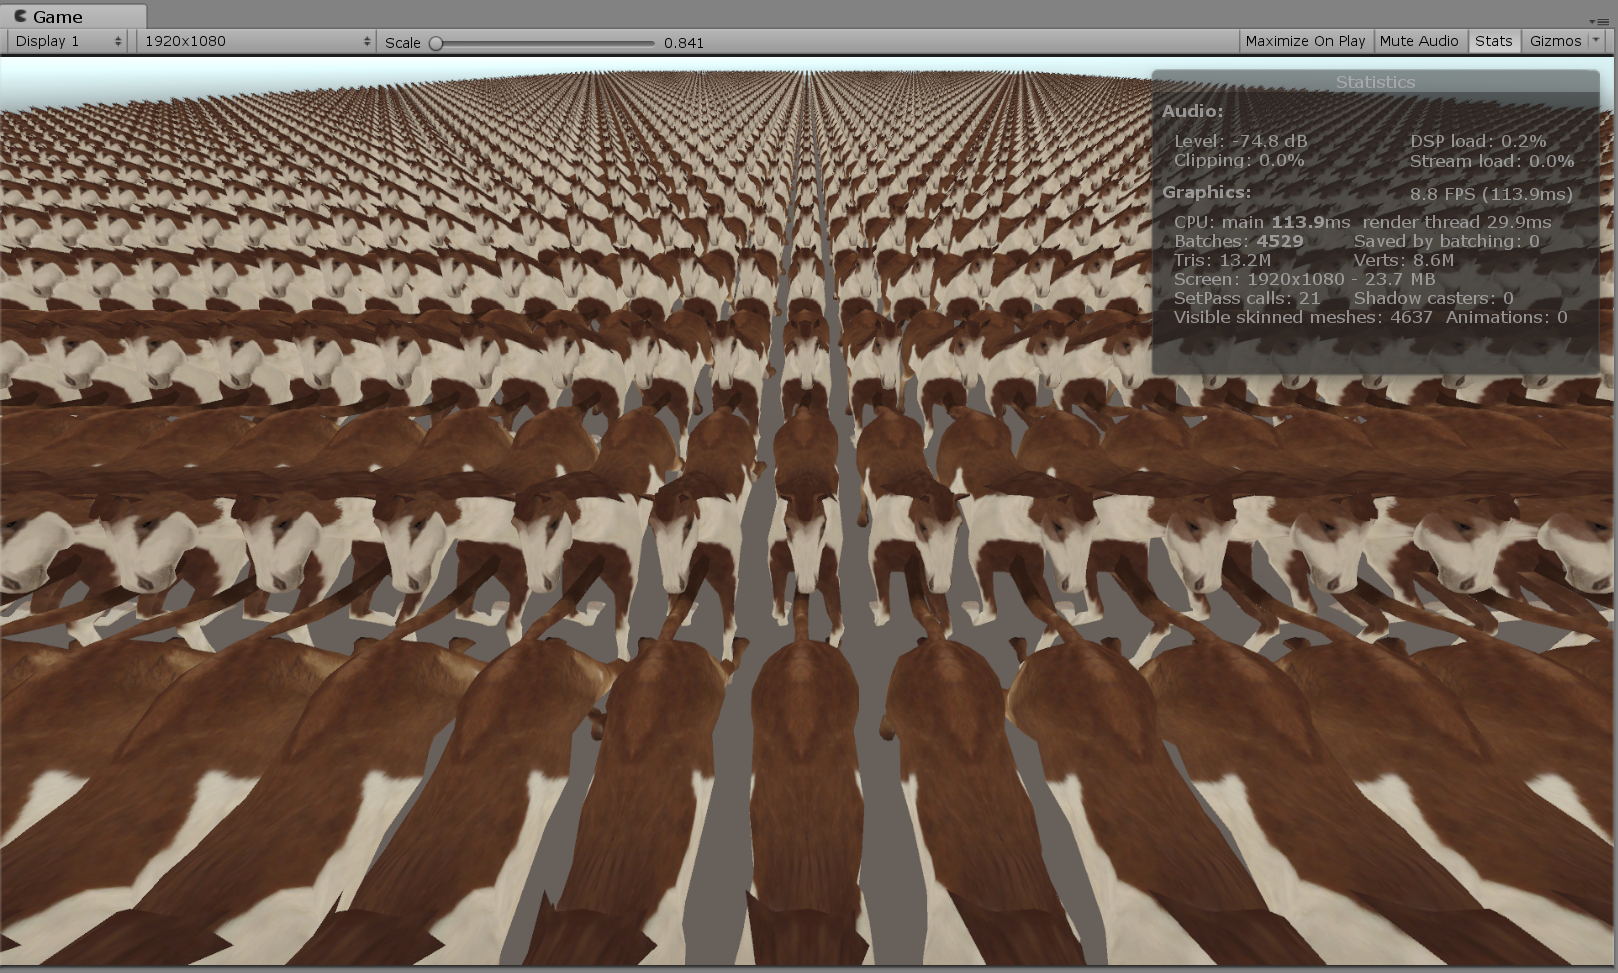
Figure 1.3: 5000 animated horses
Now, let's look at Unity's profiler to find out what is getting heavier in this process. Display Profiler (shortcut key: Ctr + 7) from the Window menu. You can get more detailed information by selecting GPU from the Add Profiler pull-down and viewing the GPU Usage profiler. Obtaining GPU Usage information itself is an overhead, so it is better not to display it when it is not needed, but this time GPU Usage will be important, so we will actively use it.
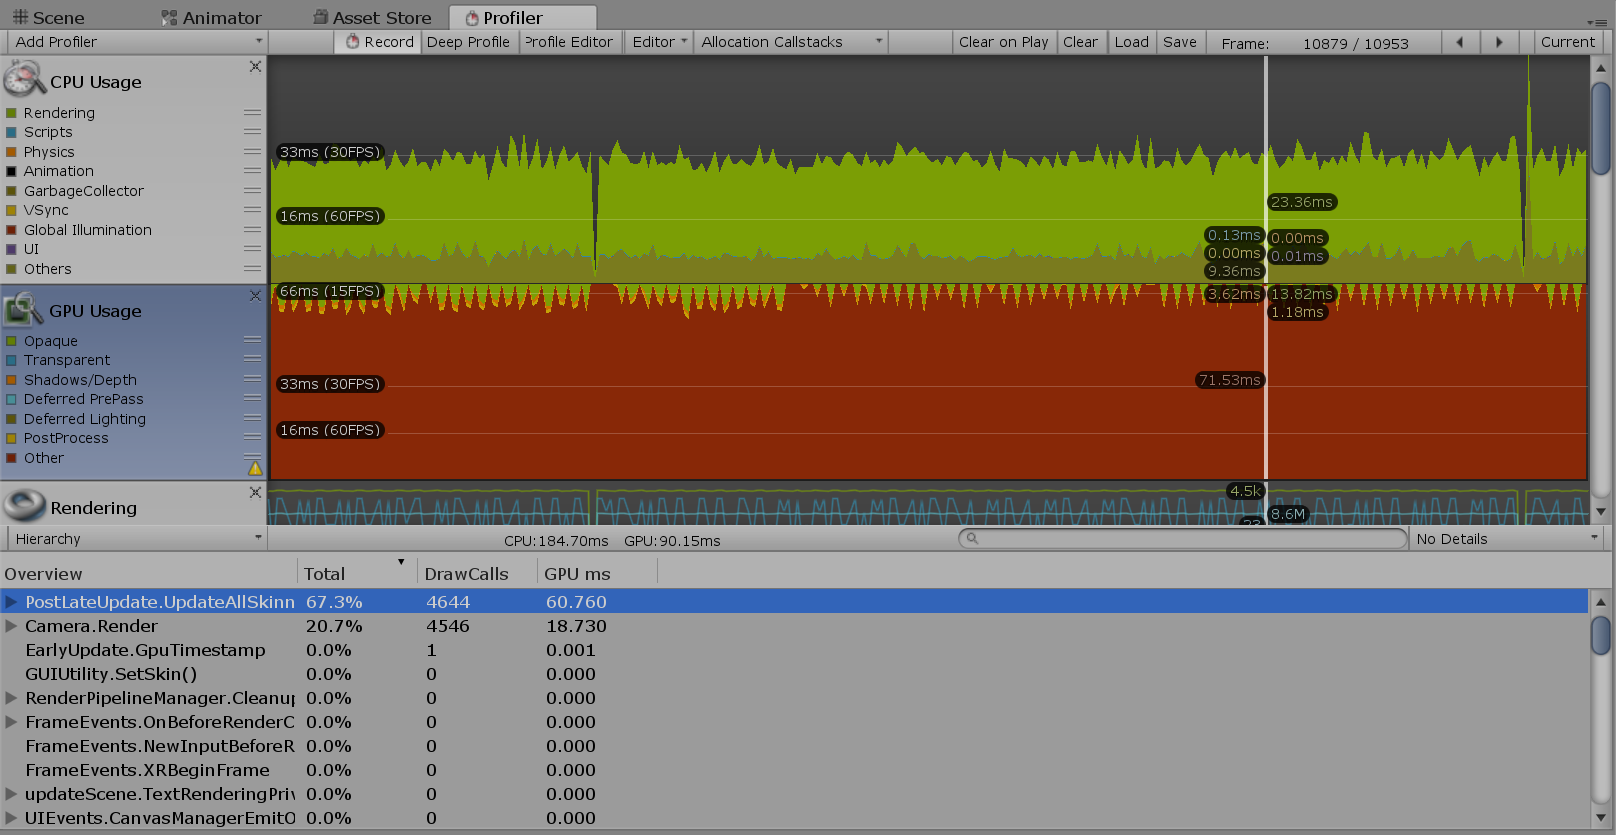
図1.4: Profiler Window (GPU Usage)
Looking at the profiler, you can see that the GPU processing time is longer than the CPU processing time, and the CPU is waiting for the GPU processing to complete. Figure 1.4 And PostLateUpdate.UpdateAllSkinnedMeshesyou can see that about 70% of GPU processing is occupied. Also, since there are as many horse objects as you can see, it Camera.Rendererseems that you can reduce the number of GPU rendering processes by batching the objects or performing GPU instancing. It is the way, but in the same way as any CPU Usage PostLateUpdate.UpdateAllSkinnedMeshesand Camera.Renderprocessing of account for most of the time.
In this test scene, the Player Settings are set to use GPU Skinning. If you were skinning on the CPU instead of the GPU, the CPU processing rate would increase and the FPS would be lower than it is now. At the time of GPU skinning, the CPU side calculates the bone matrix, passes the matrix information to the GPU, and performs the skinning process on the GPU. At the time of CPU skinning, matrix calculation and skinning processing are performed on the CPU side, and the skinned vertex data is passed to the GPU side.
In this way, in order to optimize processing, it is important to first determine where the processing bottleneck is.
As a result of profiling, the mesh skinning process seems to be heavy. Now that I know that, I would like to consider a method of calculating in advance instead of performing the skinning process itself in real time.
SkinnedMeshRendererSkinnedMeshRenderer.BakeMesh(Mesh)There is a function called as a method to acquire the vertex information after the skinning process of . It takes a snapshot of the skinned mesh and stores it in the specified mesh. It takes a little time to process, but it can be selected if it is used to store skinned vertex information in advance.
Listing 1.1: SkinnedMeshRenderer.BakeMesh () Example
 1: animator animator;
 2: SkinnedMeshRenderer skinedMesh;
 3: List<Mesh> meshList;
 4:
 5: void Start(){
 6:     animator = GetComponent<Animator>();
 7:     skinnedMesh = GetComponentInChildren<SkinnedMeshRenderer>();
 8:     meshList = new List<Mesh>();
 9:     animator.Play("Run");
10: }
11:
12: void Update(){
13: var mesh = new Mesh ();
14: skinnedMesh.BakeMesh (mesh);
15: // A snapshot of the skinned mesh is stored in mesh
16:     meshList.Add(mesh);
17: }
SkinnedMeshRendererNow, the mesh of the snapshot of each frame of the animation of the Animator's Run state will be stored in the meshList. Listing 1.1
If meshListyou use this saved file MeshFilter.sharedMeshand switch the mesh ( ) in the same way as switching pictures in a flip book, SkinnedMeshRendereryou can display the animation of the mesh without using, so the skinning process that was a bottleneck as a result of profiling It seems that you can omit.
However, if this implementation saves multiple Mesh data for each frame, mesh information (Mesh.indeces, Mesh.uv, etc.) that is not changed by animation will also be saved, resulting in a lot of waste. In the case of skinning animation, the only data to be updated is the vertex position information and normal information, so you only need to save and update these.
One possible method is to have the vertex position and normal data for each frame in an array of Vector3, and update the mesh position and normal for each frame. Listing 1.2
Listing 1.2: Update Mesh
 1: Mesh objMesh;
 2: List<Vector3>[] vertecesLists;
 3: List<Vector3>[] normalsLists;
 4: // Saved vertex information
 5: // For use with Mesh.SetVertices (List <Vector3>)
 6:
 7: void Start(){
 8:     objMesh = GetComponent<MeshFilter>().mesh;
 9:     objMesh.MarkDynamic();
10: }
11:
12: void Update(){
13:     var frame = xx;
14: // Calculate the frame at the current time
15:
16: objMesh.SetVertices (vertecesLists [frame]);
17:     objMesh.SetNormals(normalsLists[frame]);
18: }
However, this method puts a heavy CPU load on the mesh update itself for the purpose of displaying the thousands of animation objects that we are trying to solve.
So, as the answer is written from the beginning of this chapter, we store the position information and normal information in the texture, and use VertexTextureFetch to update the vertex position and normal information of the mesh in the vertex shader. This eliminates the need to update the original mesh data itself, making it possible to realize vertex animation without the processing load of the CPU.
Now, let's briefly explain how to save the position information of mesh vertices in a texture.
Unity Meshobjects are classes that store data such as vertex positions, normals, and UV values of 3D models displayed in Unity. In the vertex position information ( Mesh.vertices), the position information for all the vertices of the mesh is Vector3saved as an array. Table 1.1
And Unity Texture2Dobjects are saved as an array of color information ( ) for the number of pixels of texture width ( texture.width) x height ( texture.height) Color. Table 1.2
Table 1.1: Location Information (Vector3)
| x float x direction component |
|---|
| y float y direction component |
| z float z direction component |
Table 1.2: Pornography (Color)
| r float red component |
|---|
| g float green component |
| b float cyan component |
| a float opacity component |
Positions of the vertices, Mesh.Vertices Table 1.1 x the, y, and z values respectively, the color information of Texture2D Table 1.2 contains r of, g, a b, when stored as TextureAsset in EditorScript, texture vertex position information It will be saved as. This is a sample script that saves the positions and normals of mesh vertices as texture colors. Listing 1.3
Listing 1.3: Saving vertex information to texture
 1: public void CreateTex(Mesh sourceMesh)
 2: {
 3:     var vertCount = sourceMesh.vertexCount;
 4:     var width = Mathf.FloorToInt(Mathf.Sqrt(vertCount));
 5:     var height = Mathf.CeilToInt((float)vertCount / width);
 6: // Find the width and height where the number of vertices <width x height
 7:
 8:     posTex = new Texture2D(width, height, TextureFormat.RGBAFloat, false);
 9:     normTex = new Texture2D(width, height, TextureFormat.RGBAFloat, false);
10: // Texture2D to store Color []
11: // By specifying TextureFormat.RGBAFloat, you can have color information with each element Float value.
12:
13:     var vertices = sourceMesh.vertices;
14: var normals = sourceMesh.normals;
15:     var posColors = new Color[width * height];
16:     var normColors = new Color[width * height];
17: // Color information array for the number of vertices
18:
19:     for (var i = 0; i < vertCount; i++)
20:     {
21:         posColors[i] = new Color(
22:             vertices[i].x,
23: vertices [i] .y,
24:             vertices[i].z
25:         );
26:         normColors[i] = new Color(
27:             normals[i].x,
28:             normals[i].y,
29:             normals[i].z
30:         );
31:     }
32: // At each vertex, Color.rgb = Vector3.xyz,
33: // Generate a color array (Color []) such that position → color, normal → color.
34:
35:     posTex.SetPixels(posColors);
36:     normTex.SetPixels(normColors);
37:     posTex.Apply();
38:     normTex.Apply();
39: // Set the color array to the texture and apply
40: }
Now, Meshthe position of the vertex of, we were able to normal information position texture, stamped in the normal texture.
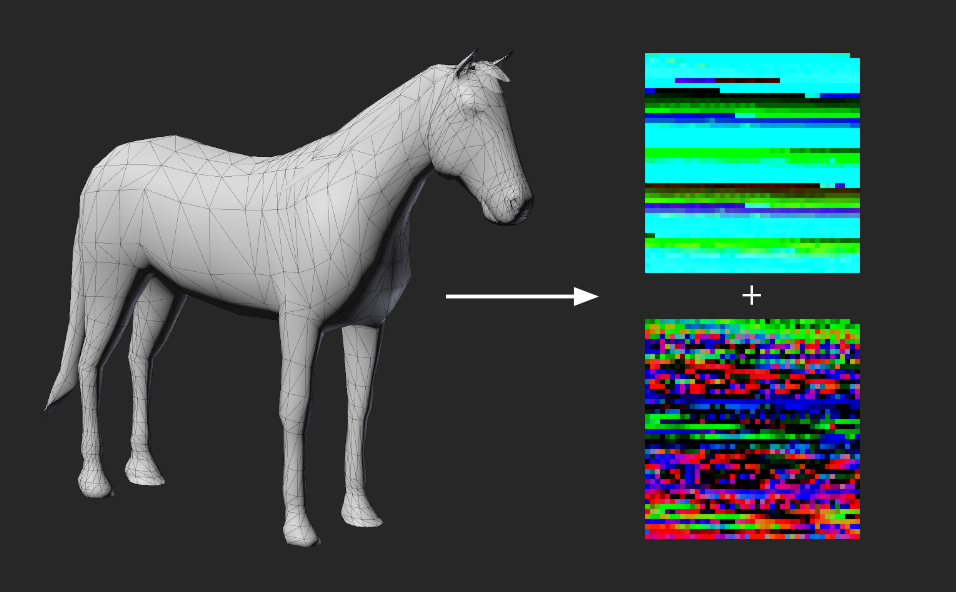
Figure 1.5: Write Mesh vertex positions and normals to Texture
Actually, since there is no index data for making polygons, it is not possible to reproduce the shape of the mesh with only the position texture and normal texture, but it is possible to write the mesh information to the texture. It's done. Figure 1.5
In the Unity of the official manual, Texture2D.SetPixels(Color[])it is ColorFormat.RGBA32,ARGB32,RGB24,Alpha8to work if only. is what it reads. This is only for fixed-point and fixed-precision texture formats, but apparently RGBAHalf, RGBAFloatit works with floating-point values, even if you assign a negative value or a value of 1 or more to each element of the color. , Clampit seems to us to hold the value without being. ColorSubstituting a fixed precision texture limits the RGB value to a value between 0 and 1 and the precision to 1/256.
In the method of burning the vertex information of this animation into a texture, the animation is sampled at regular intervals, the vertex information of the mesh of each frame is arranged, and a series of animation information is burned into one texture. A total of two textures, a position information texture and a normal information texture, are generated.
This time, AnimationClip.SampleAnimation(gameObject, time);we will use the function to sample the animation . For the specified GameObject, set it to the state of the specified time of AnimationClip. So Animation, Animatorit supports both legacy and legacy . (Rather, it's a way to play an animation without using Animation or Animator components.)
Now, I will explain the actual implementation of specifying a frame from AnimationClip and acquiring the vertex position.
This program consists of the following three elements.
With AnimationClipTextureBaker, get AnimationClip from Animation or Animator, and create ComputeBuffer of mesh vertex data while sampling AnimationClip to each frame. And it is ComputeShader that converts ComputeBuffer of vertex animation information created from AnimationClip and Mesh data into position information texture and normal information texture with MeshInfoTextureGen.compute.
TextureAnimPlayer.shader is a Shader for animating the mesh with the created location and normal textures.

図1.6: AnimationClipTextureBaker Inspector
AnimationClipTextureBakerInspector. Sets to ComputeShaderplay the animated texture for generating the animated texture Shader. Then, set what you want AnimationClipto texture to Clips. Figure 1.6
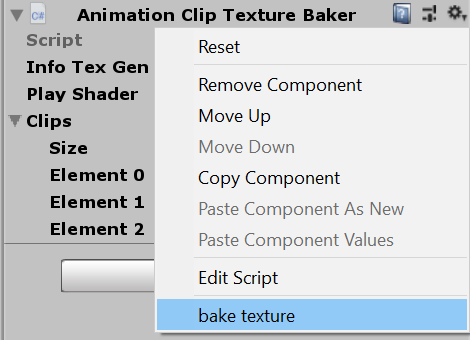
Figure 1.7: Texture writing can be done from the context menu in the Inspector
ContextMenuAttributeAllows you to call methods in your script from the context menu in Unity's Inspector. It is convenient because it can be executed without creating an editor extension. In this case, Bakeyou can call the script from "bake texture" in the context menu . Figure 1.6
Now let's look at the actual code.
Listing 1.4: AnimationClipTextureBaker.cs
 1: using System.Collections.Generic;
 2: using System.Linq;
 3: using UnityEngine;
 4:
 5: #if UNITY_EDITOR
 6: using UnityEditor;
 7: using System.IO;
 8: #endif
 9:
10: public class AnimationClipTextureBaker : MonoBehaviour
11: {
12:
13:     public ComputeShader infoTexGen;
14:     public Shader playShader;
15:     public AnimationClip[] clips;
16:
17: // Vertex information is a structure of position and normal
18: public struct VertInfo
19:     {
20:         public Vector3 position;
21:         public Vector3 normal;
22:     }
23:
24: // Reset () is called when scripting a GameObject in the editor
25:     private void Reset()
26:     {
27: var animation = GetComponent <Animation> ();
28: var animator = GetComponent <Animator> ();
29:
30:         if (animation != null)
31:         {
32:             clips = new AnimationClip[animation.GetClipCount()];
33: var i = 0;
34:             foreach (AnimationState state in animation)
35:                 clips[i++] = state.clip;
36:         }
37:         else if (animator != null)
38:             clips = animator.runtimeAnimatorController.animationClips;
39: // Automatically set AnimationClip if there is an Animation or Animator component
40:     }
41:
42:     [ContextMenu("bake texture")]
43:     void Bake()
44:     {
45: var skin = GetComponentInChildren <SkinnedMeshRenderer> ();
46:         var vCount = skin.sharedMesh.vertexCount;
47:         var texWidth = Mathf.NextPowerOfTwo(vCount);
48: var mesh = new Mesh ();
49:
50:         foreach (var clip in clips)
51:         {
52:             var frames = Mathf.NextPowerOfTwo((int)(clip.length / 0.05f));
53:             var dt = clip.length / frames;
54:             var infoList = new List<VertInfo>();
55:
56:             var pRt = new RenderTexture(texWidth, frames,
57:                 0, RenderTextureFormat.ARGBHalf);
58:             pRt.name = string.Format("{0}.{1}.posTex", name, clip.name);
59:             var nRt = new RenderTexture(texWidth, frames,
60:                 0, RenderTextureFormat.ARGBHalf);
61:             nRt.name = string.Format("{0}.{1}.normTex", name, clip.name);
62:             foreach (var rt in new[] { pRt, nRt })
63:             {
64:                 rt.enableRandomWrite = true;
65:                 rt.Create();
66:                 RenderTexture.active = rt;
67:                 GL.Clear(true, true, Color.clear);
68:             }
69: // Texture initialization
70:
71:             for (var i = 0; i < frames; i++)
72:             {
73:                 clip.SampleAnimation(gameObject, dt * i);
74: // Sampling GameObject at the specified time of AnimationClip
75:                 skin.BakeMesh(mesh);
76: // Call BakeMesh () to get the mesh data in the skinned state
77:
78:                 infoList.AddRange(Enumerable.Range(0, vCount)
79:                     .Select(idx => new VertInfo()
80:                     {
81:                         position = mesh.vertices[idx],
82:                         normal = mesh.normals[idx]
83:                     })
84:                 );
85: // Store the animation frame in the list first
86:             }
87:             var buffer = new ComputeBuffer(
88:                 infoList.Count,
89:                 System.Runtime.InteropServices.Marshal.SizeOf(
90: typeof (VertInfo)
91:                 )
92:             );
93:             buffer.SetData(infoList.ToArray());
94: // Set vertex information in ComputeBuffer
95:
96:             var kernel = infoTexGen.FindKernel("CSMain");
97: uint x, y, z;
98:             infoTexGen.GetKernelThreadGroupSizes(
99:                 kernel,
100:                 out x,
101: out y,
102:                 out z
103:             );
104:
105:             infoTexGen.SetInt("VertCount", vCount);
106:             infoTexGen.SetBuffer(kernel, "Info", buffer);
107:             infoTexGen.SetTexture(kernel, "OutPosition", pRt);
108:             infoTexGen.SetTexture(kernel, "OutNormal", nRt);
109:             infoTexGen.Dispatch(
110:                 kernel,
111:                 vCount / (int)x + 1,
112:                 frames / (int)y + 1,
113:                 1
114:             );
115: // Set up Compute Shader and generate textures
116:
117:             buffer.Release();
118:
119: // Editor script to save the generated texture
120: #if UNITY_EDITOR
121:             var folderName = "BakedAnimationTex";
122:             var folderPath = Path.Combine("Assets", folderName);
123:             if (!AssetDatabase.IsValidFolder(folderPath))
124:                 AssetDatabase.CreateFolder("Assets", folderName);
125:
126:             var subFolder = name;
127:             var subFolderPath = Path.Combine(folderPath, subFolder);
128:             if (!AssetDatabase.IsValidFolder(subFolderPath))
129:                 AssetDatabase.CreateFolder(folderPath, subFolder);
130:
131:             var posTex = RenderTextureToTexture2D.Convert(pRt);
132:             var normTex = RenderTextureToTexture2D.Convert(nRt);
133:             Graphics.CopyTexture(pRt, posTex);
134:             Graphics.CopyTexture(nRt, normTex);
135:
136: var mat = new Material (playShader);
137:             mat.SetTexture("_MainTex", skin.sharedMaterial.mainTexture);
138:             mat.SetTexture("_PosTex", posTex);
139:             mat.SetTexture("_NmlTex", normTex);
140:             mat.SetFloat("_Length", clip.length);
141:             if (clip.wrapMode == WrapMode.Loop)
142:             {
143:                 mat.SetFloat("_Loop", 1f);
144:                 mat.EnableKeyword("ANIM_LOOP");
145:             }
146:
147:             var go = new GameObject(name + "." + clip.name);
148:             go.AddComponent<MeshRenderer>().sharedMaterial = mat;
149:             go.AddComponent<MeshFilter>().sharedMesh = skin.sharedMesh;
150: // Set the generated texture as a material, set the mesh and make a Prefab
151:
152:             AssetDatabase.CreateAsset(posTex,
153:                 Path.Combine(subFolderPath, pRt.name + ".asset"));
154:             AssetDatabase.CreateAsset(normTex,
155:                 Path.Combine(subFolderPath, nRt.name + ".asset"));
156:             AssetDatabase.CreateAsset(mat,
157:                 Path.Combine(subFolderPath,
158:                 string.Format("{0}.{1}.animTex.asset", name, clip.name)));
159:             PrefabUtility.CreatePrefab(
160:                 Path.Combine(folderPath, go.name + ".prefab")
161:                 .Replace("\\", "/"), go);
162:             AssetDatabase.SaveAssets();
163:             AssetDatabase.Refresh();
164: #endif
165:         }
166:     }
167: }
If RenderTextureyou generate it once , process it on the GPU, copy it to, Graphics.CopyTexture(rt,tex2d);and Texture2Dsave it as a Unity Asset with an editor script, it will be an asset that can be used without recalculation from now on, so I think it is a versatile technique. Listing 1.4 (lines 119,120)
In this implementation, it is implemented by writing to the texture ComputeShader. When doing a lot of processing, using the GPU is faster, so it is a useful technique, so please try to master it. As for the processing content, the position buffer and normal buffer of the vertex animation generated by the script are simply placed in each pixel as they are. Listing 1.5
Listing 1.5: MeshInfoTextureGen.compute
 1: #pragma kernel CSMain
 2:
 3: struct MeshInfo{
 4:     float3 position;
 5:     float3 normal;
 6: };
 7:
 8: RWTexture2D<float4> OutPosition;
 9: RWTexture2D<float4> OutNormal;
10: StructuredBuffer<MeshInfo> Info;
11: int VertCount;
12:
13: [numthreads(8,8,1)]
14: void CSMain (uint3 id : SV_DispatchThreadID)
15: {
16:     int index = id.y * VertCount + id.x;
17:     MeshInfo info = Info[index];
18:
19:     OutPosition[id.xy] = float4(info.position, 1.0);
20:     OutNormal[id.xy] = float4(info.normal, 1.0);
21: // Arrange the vertex information so that the x-axis of the texture is the vertex ID and the y-axis direction is time.
22: }
Here is the texture generated from the script. Figure 1.8
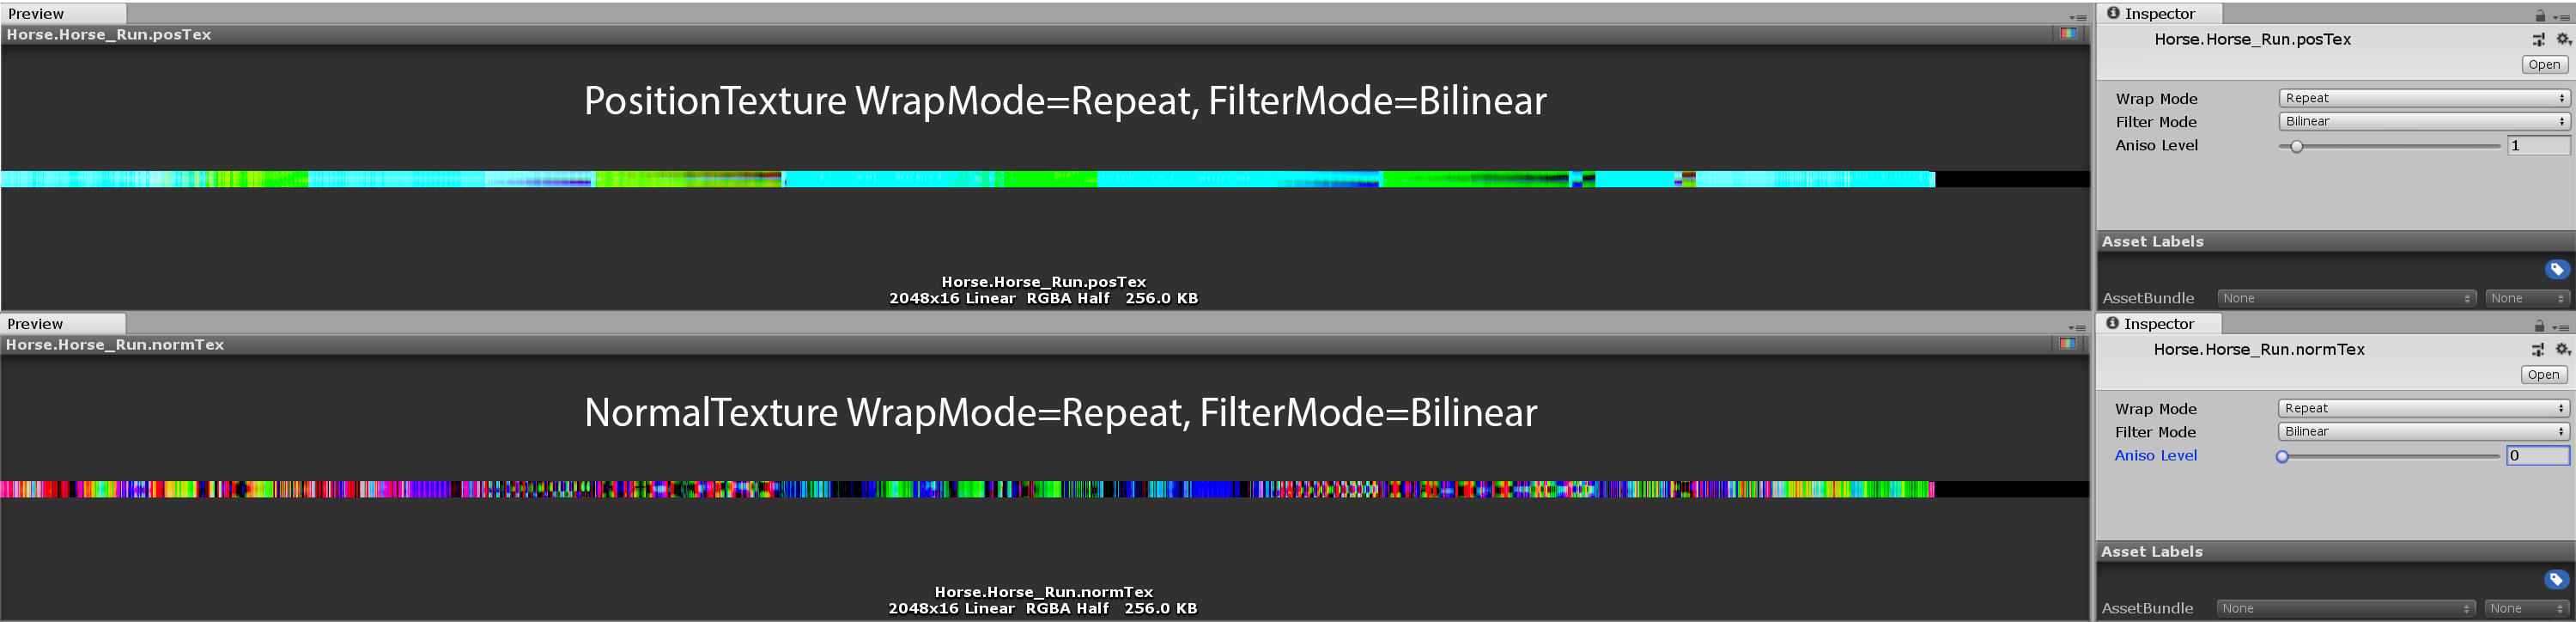
Figure 1.8: Generated texture
This texture stores the vertices of the mesh in each sampled frame, one column in the x-axis direction. And the uv.ytexture is designed so that the y-axis direction is time and you can specify the animation time by changing when sampling the texture.
What I would like you to pay attention to Texture.FilterMode = Bilinearis Tokoro. When sampling a texture, each pixel is interpolated with adjacent pixels, which causes the Shader to play an animated texture with a halfway time between the frame sampled by the script during texture generation and the next frame. When sampled, the frame-by-frame positions and normals will be automatically interpolated, resulting in smooth playback of the animation. The explanation is a little complicated!
And in this case, the Run animation is a loop animation WrapMode = Repeat. This interpolates the last and first pixels of the animation texture, resulting in a smooth looped animation. Of course, if you WrapMode = Clampwant to generate a texture from a non-looping animation, you need to set it to.
Next is the Shader for playing the generated animation texture. Listing 1.6
Listing 1.6: TextureAnimPlayer.shaer
 1: Shader "Unlit/TextureAnimPlayer"
 2: {
 3:     Properties
 4:     {
 5:             _MainTex ("Texture", 2D) = "white" {}
 6:             _PosTex("position texture", 2D) = "black"{}
 7:             _NmlTex("normal texture", 2D) = "white"{}
 8:             _DT ("delta time", float) = 0e
 9:
10:             _Length ("animation length", Float) = 1
11:             [Toggle(ANIM_LOOP)] _Loop("loop", Float) = 0
12:     }
13:     SubShader
14:     {
15:             Tags { "RenderType"="Opaque" }
16: LOD 100 Cull Off
17:
18:             Pass
19:             {
20:                     CGPROGRAM
21:                     #pragma vertex vert
22:                     #pragma fragment frag
23:                     #pragma multi_compile ___ ANIM_LOOP
24: // It is convenient to make a multi-compile for the loop
25:
26:                     #include "UnityCG.cginc"
27:
28:                     #define ts _PosTex_TexelSize
29:
30:                     struct appdata
31:                     {
32:                             float2 uv : TEXCOORD0;
33:                     };
34:
35:                     struct v2f
36:                     {
37:                             float2 uv : TEXCOORD0;
38:                             float3 normal : TEXCOORD1;
39:                             float4 vertex : SV_POSITION;
40:                     };
41:
42:                     sampler2D _MainTex, _PosTex, _NmlTex;
43:                     float4 _PosTex_TexelSize;
44:                     float _Length, _DT;
45:
46:                     v2f vert (appdata v, uint vid : SV_VertexID)
47: // You can get the vertex ID with the semantic of SV_VertexID
48:                     {
49:                             float t = (_Time.y - _DT) / _Length;
50: #if ANIM_LOOP
51:                             t = fmod(t, 1.0);
52: #else
53:                             t = saturate(t);
54: #endif
55:
56:                             float x = (vid + 0.5) * ts.x;
57:                             float y = t;
58: // uv.x is specified based on the vertex ID
59: // Set the time (t) to sample the animation in uv.y
60:
61:                             float4 pos = tex2Dlod(
62: _PosTex,
63: float4 (x, y, 0, 0)
64:                 );
65:                             float3 normal = tex2Dlod(
66:                     _NmlTex,
67: float4 (x, y, 0, 0)
68:                 );
69: // Sampling location and normal information from textures
70:
71:                             v2f o;
72:                             o.vertex = UnityObjectToClipPos(pos);
73: o.normal = UnityObjectToWorldNormal (normal);
74:                             o.uv = v.uv;
75:                             return o;
76:                     }
77:
78:                     half4 frag (v2f i) : SV_Target
79:                     {
80:                 half diff = dot(
81:                     i.normal,
82:                     float3(0, 1, 0)
83:                 ) * 0.5 + 0.5;
84:                             half4 col = tex2D(_MainTex, i.uv);
85:                             return diff * col;
86:                     }
87:                     ENDCG
88:             }
89:     }
90: }
Shaders that play animated textures use a technique called VertexTextureFetch (VTF). Simply put, the texture is sampled in the vertex shader and used to calculate the position of the vertices and each value. This method is often used for displacement mapping, etc.
I'm using the vertex ID to sample the texture, which SV_VertexIDcan be obtained semantically. Since the vertex information obtains both the position information and the normal information from the texture, the part where there is only uv in the app data is also noteworthy. ( appdataTo POSITION,NORMALnot be a particularly error to define a semantic)
The UV when sampling the texture, uv.yis the normalized time of the animation (the value when the start of the animation is 0 and the end is 1.0). uv.xIs the vertex index (vid), uv.x = (vid + 0.5) * _TexelSize.xand what is this 0.5? You may think that this is the position Bilinearwhen sampling the texture with , (n + 0.5) / テクスチャサイズbecause you can get the value in the uninterpolated texture, so add the value of 0.5 to the vertex ID and mesh We are getting the uninterpolated positions and normals between the vertices inside.
Listing 1.7: {TextureName} _TexelSize Float4 properties with texture size information (from Unity official manual)
x contains 1.0 / width
y contains 1.0 / height
z contains width
w contains height
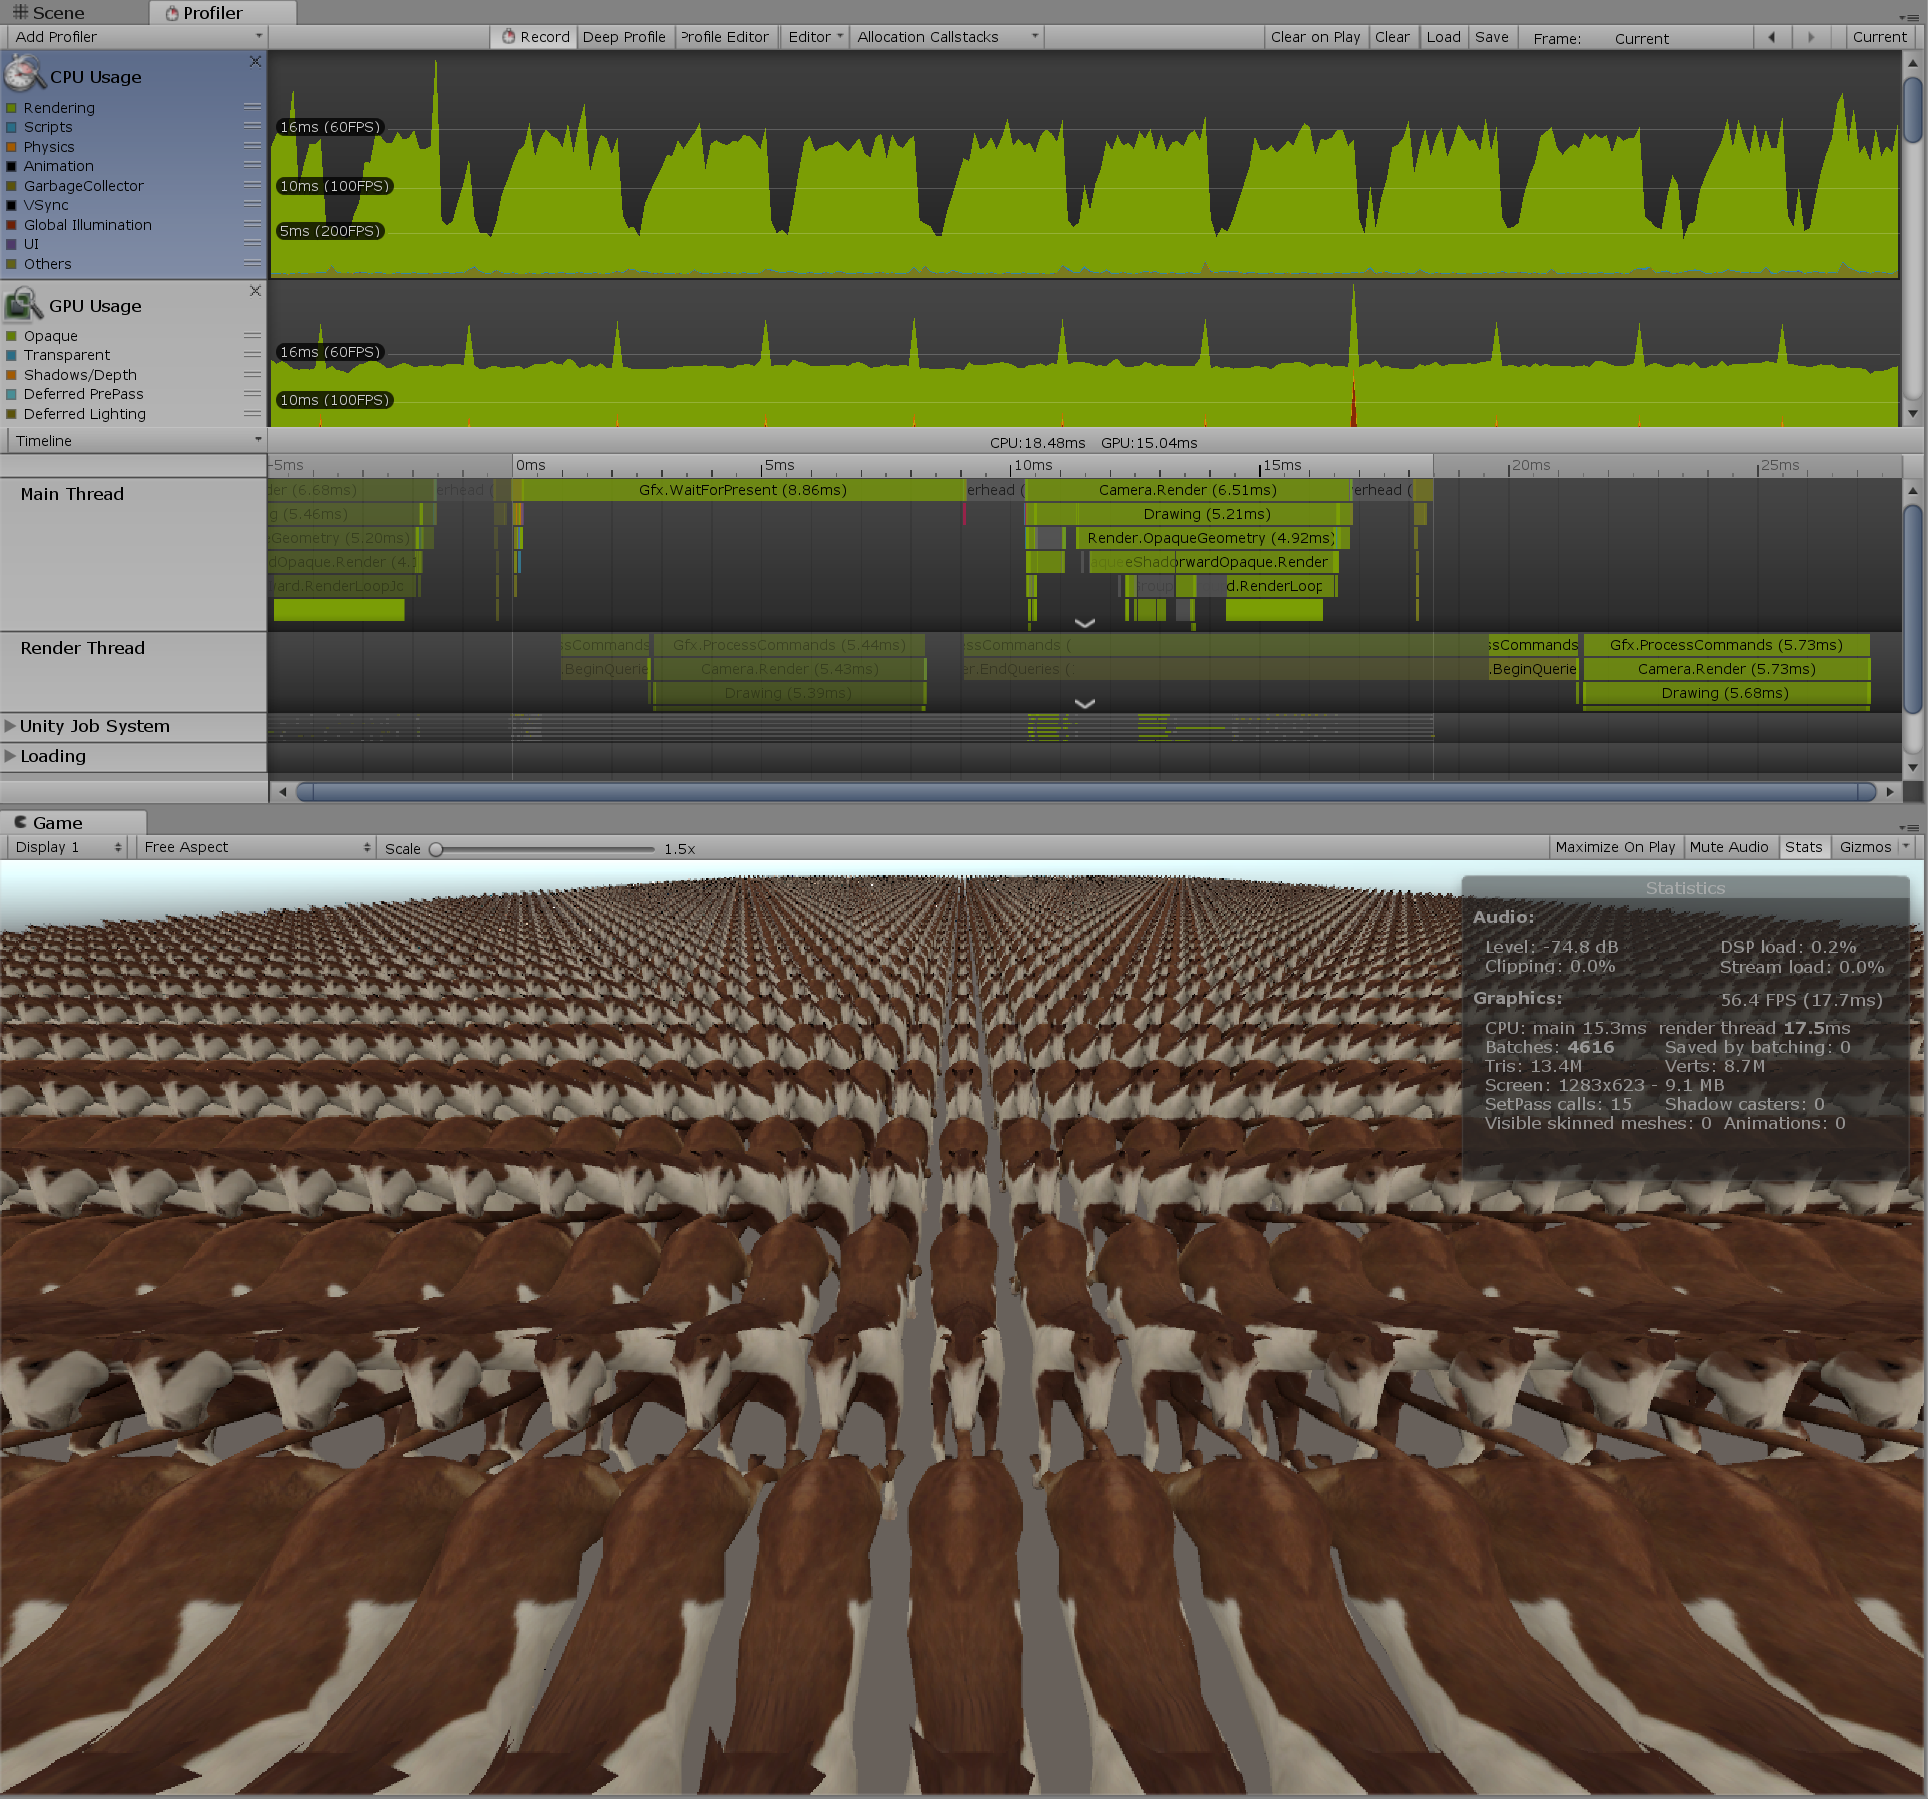
Figure 1.9: 5000 horses animated by texture
SkinnedMeshRendererThe Rendereranimation is being played without using and with animation textures. FPS is greatly improved from 8 to 56.4 compared to when using skinning animation. Figure 1.9
* The GPU of the PC currently being written is GeForce MX150, which is the weakest of the NVIDIA Pascal GPUs. The rendering resolution was a bit smaller because we captured the profiler and the game window at the same time, but that shouldn't be that much as most of the processing load was mesh skinning. .. !!
Also, I would like you to pay attention to the fact that other optimization processing such as instancing support is not performed. SkinnedMeshRendererSince we no longer use, it is now possible to draw with GPU instancing. It means that it is possible to pursue further performance by supporting Shader's instancing.
Although not explained here, the bird on the cover uses texture-animated Graphics.DrawMeshInstancedIndirect()birds to draw about 4000 birds at once. For Shader instancing support and other applications, check out my GitHub and other articles.
There are some restrictions on the technique using this texture. The memory for holding the texture is consumed depending on the number of vertices of the mesh and the length of the animation. You need to write a Shader to blend the animation. The state machine of AnimatorController cannot be used. Etc.
The biggest limitation is the maximum size of textures that can be used for each hardware. It can be 4K, 8K, 16K. In other words, in this method, the vertices of each frame of the mesh are arranged in a horizontal row, so the number of vertices of the mesh is limited by the texture size.
However, when you output a large number of objects, you should not output those with such a large number of vertices, so it is a good idea to accept the limit on the number of vertices as it is and make sure that the number of vertices of the mesh does not exceed the maximum size of the texture. maybe. If you want to use baking animation textures beyond this limit on the number of vertices, you can consider using multiple textures.
Alternatively, you can pre-calculate the matrix for each bone in the skeleton instead of the vertices of the mesh and save it in a texture or buffer. Since the skinning process itself is performed by Vertex Shader at the time of execution, the skinning process that was performed during normal mesh skinning PostLateUpdate.UpdateAllSkinnedMeshesis performed Camera.Rendercollectively at the time of rendering, so the processing load is considerably lightened. Please, try it.
Since AnimatorController and Unity's state machine cannot be used, it is difficult to control the animation, so it is better to apply it to some deception such as mobs that repeat loop animation and swarms of flying birds and butterflies instead of the main character. I think it's good.